Monday, February 29, 2016

Faith Builders Bible by Zonderkidz - A Schoolhouse Crew Review


Do you have a Lego lover in your life? We have Legos all over our house, and what better way could they be used than to learn bible stories in the bible?  Gavin has been in need of a new bible, so when I saw the Faith Builders Bible by Zonderkidz, I knew he would be so excited. From the beautiful and colorful cover to the great illustrations inside it is sure to make the brick builder in your life happy! Every bible made by Zondervan that I have ever seen has been a very nice bible. They seem to have a bible for everyone!

Faith Builders Bible {Zonderkidz Review}
Gavin loves all things Lego. He even has his own Lego station in the loft of our house. He loves nothing more than to sit up there and make up creations. When I saw this bible, and all of the beautifully illustrated pictures in it, I knew that it would give him all kinds of ideas, but also teach him bible stories along the way. We are a very visual learning family, so when we learn about a story, and can create something to remind us of that story, then we are more likely to remember it.


What we got:

The Faith Builders bible is a hard back, full text, NIrV bible. If you've never heard of the NIrV bible, it stands for New International Readers Version. This just makes it easier to read especially with young readers. 

There are 24 full-color pages of bible stories. They really outdid themselves with these scenes. My son couldn't believe that even the mini-figures that were used in their scenes REALLY look like bible characters. Of course now he wants some!

How we used it and ideas they give:

The first thing we use this bible for is obviously reading it. We have a bible curriculum that we use every week and a memory verse. Gavin is working on finding verses in the bible on his own. I do love the fact that it has a Table of Contents in the front so that if he's having trouble, he can quickly find it, and get to his page. 

I was impressed from the very first page with the full color illustrations. In the beginning, before the bible even starts, they have a great page with an idea on how to teach the books of the bible with the building blocks. We discussed that the bible starts with Genesis and ends with Revelations and that there are 66 books in the bible. We didn't have a way to label our Legos so we just used the page as a visual. I love how they break it up not only into Old Testament and New Testament but also into sections such as Law, History, Poetry, Prophets, Gospels, and more.


The very first day we got the bible we jumped right in on the second page. Gavin couldn't wait to run up stairs and build the cross! He decided that he was going to build the cross but also add Jesus to it. We thought it was funny that our Jesus was wearing camo. We talked about the bible verse that's on the page, which is Mark 8:34, and also what Jesus did for us when He died on the cross for us. I loved how this has already sparked conversation just from looking at the pictures and building a little scene of our own!

Faith Builders Bible {Zonderkidz Review}


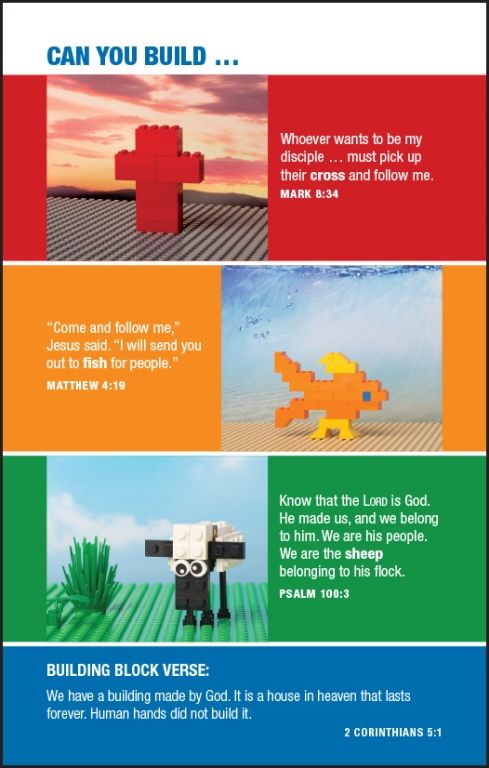
Gavin also decided to build the second picture which is the fish that represents Matthew 4:19. We discussed that verse and how we should follow Jesus everyday in all that we do, and He will send us out to share Him with others!


Gav was having a hard time deciding on which scene he wanted to work on first. These ideas are a Lego lovers dream! He finally settled on the day Jesus was born in the manger. We have talked about this for so long since it's what Christmas is all about!  He couldn't make his as detailed as the picture, but that's ok! He had so much fun doing it, and now he has his own visual to remember that Jesus was born in a manger.


There's nothing more pleasing to a mom than when your child is eager to learn about the bible and the stories in it! Faith Builders Bible by Zonderkidz is such a treasure for a Lego kid like mine. It is something that he can relate to and it's another tool to make learning about Jesus fun!  I think the price tag on this bible at $24.99 is more than reasonable. I actually had expected it to be much more than that. If you don't have a Lego lover in your home, go check out their other bibles over at Zondervan because they really do have one for everyone!

Follow them on social media!
Facebook: Zonderkidz
Twitter: Zonderkidz


Faith Builders Bible {Zonderkidz Review}


Crew Disclaimer

Saturday, February 27, 2016

Quick Morning Smoothie - Blogging Through the Alphabet


So, I needed to make a quick post before we leave for vacation, and it's time for the letter Q in the Blogging through the Alphabet series! I was sitting here trying to decide what in the world I could write about that started with Q. It's not that easy lol. 

I've made this lifestyle change lately from being a SAD vegetarian, to adding a lot of healthier choices to my diet, and hoping to eventually be a raw vegan.  I started drinking smoothies for breakfast and I'm loving them. My favorite so far is my blueberry and banana smoothie. It's so good and it gives me energy and keeps me very full! I didn't take pictures of all of the ingredients separate this time because it was too late...but honestly it's so easy you don't need many pictures to follow. 


Blueberry and Banana Breakfast Smoothie


Ingredients:
5 to 7 frozen bananas
1 cup of blueberries
1 cup of greens (I use a mixture called Power Greens)
3 cups of coconut water

Blend until smooth. 
 I use a big blender. A little bullet probably won't work since it's not very big.

Seriously that's it. Obviously you can add whatever fruit you want. I also like frozen or fresh mango and of course strawberries!  


Let me know what your favorite morning smoothie is. I'm wanting to try different variations and flavors!

  If you would like to link up your own Blogging through the Alphabet posts, click the link below!

Blogging Through the Alphabet” style=

Wednesday, February 24, 2016

Weekly Bible Verse - Week 20


We are still doing our wonderful bible study, but since we are leaving for vacation, we didn't start a new week. I still wanted to post a verse, so I decided to post one of my favorites.


Psalm 119:105New International Version (NIV)


   105 
Your word is a lamp for my feet,
    a light on my path.


This verse is such a good reminder to remember that God will always shine a light on our path and guide our steps in all we do!

Sunday, February 21, 2016

Weekly Wrap-Up - Special Birthday Today!


This has been a pretty laid back week. We really didn't do much of anything out of the ordinary.

We are still loving our study of the Rainforest Journey from Edtech Lens.  We have talked about and looked at some beautiful pictures of the different layers of the Rainforest. We wanted to also read a living book to go with it, so I chose a book called "It's a Jungle Out There." It's a story about a missionary who was born and raised in the rainforests of Peru. It's really keeping our attention so far!


Gavin is really into life hacks. He has literally sat and watched Youtube videos for hours on different ones and has tried just as many. He has been begging to do the orange candle. I've been on an orange kick lately so I had a bunch and decided that it was the perfect day. So he took the orange and made a cut lightly around the perimeter of it and then he pulled the bottom half off so that the middle of the orange was like a candle wick. We poured some olive oil in it and on the wic...it worked. I have to say, in an emergency this would be a good way to have a little bit of light.


Towards the end of the week, Edyn had a bite on her arm so we decided to go ahead and take her to the dr. They ended up putting her on antibiotics, so hopefully she's on her way to recovery. It's still pretty sore for her to move it. 

So, I told you this was a pretty boring aka laid back week lol. BUT today is SOOOO SPECIAL!!!

HAPPY BIRTHDAY MILA ROSE!!!!


One year ago today, my life changed when I got to see my sweet grand doll enter this world. She has been such a blessing to us. I never knew that I could love another human as much as I did my own children. She has me wrapped around my finger so much...it's a good thing she doesn't know that yet lol. The worst part about living 300 miles from your family is missing days like this. I wish I could run over and hug her and bring her all of her gifts, but that will have to wait until next weekend. I am really excited to see her at her and celebrate at her birthday party!

So, next week there will be no weekly wrap up since we will be out of town!  I hope everyone has a great week this week coming up! :)


Thursday, February 18, 2016

P is for Painting Pottery - Blogging through the Alphabet


Last week we had a day that we had to just toss the books and get out of the house. It was a beautiful day, and I decided to take the kids to our local clay art studio. I love it because you can just pick whatever piece you want to paint, pay the price for that piece, and spend as long as you want painting it.  I think we stayed for around 2 hours. The best part is that since we went around 1, we were the only ones there. It was so peaceful, and relaxing.

Wednesday, February 17, 2016

HISTORY Through the Ages Hands-on History Lap-Pak: U.S. Elections by Home School in the Woods -A Schoolhouse Crew Review


With 2016 being an election year, I was so thrilled to be able to review HISTORY Through the Ages Hands-on History Lap-Pak: U.S. Elections by Home School in the Woods. I have never used one of their products so I really wasn't even aware of how great they are. After doing my research, I was pleased to find out that they are a Christian based company, and of course, a homeschooling family!


If you are new to homeschooling or have never heard of lapbooks, let me explain a little bit about what they are. A lapbook is kind of like a collection of little pieces of information, which are called mini-books, and they are all combined together to make one big book. This is normally done by using file folders. They can be very fun, and you can get very creative with them. Lapbooks, to me are like the little sister of notebooking. They can be used for almost any subject and also for any age. I love them because in our house, they turn into a wonderful study tool, but it's also something tangible that the kids have made, and can go back and review it at any time.


What we got:
We received the digital download version of the Elections Lap-Pak, although it is also available in the CD version. The recommended ages are for 3rd to 8th grade, but we used this just fine with my high school age kids.
U.S. Elections History Lap-Pak  Review


What I thought:
My first impression was that this lapbook is one of the best, well put together lap books I've ever used. It guides you from the very beginning and all the way through it. It's laid out so well, that it takes no time to get started. It's full of information explaining in depth about our government and how the President becomes the President. The illustrations used for the mini lessons are some of the best I've ever worked with. They definitely went the extra mile with making sure that they were all very detailed and perfect for the visual learner.

Supplies you need:
I am not the most organized person on the earth, that's no secret. No matter how hard I try, I always forget something in a lesson. In this case, I forgot to see what supplies I needed and to make sure I had them on hand. I had most of them, but I'm going to hopefully save you a little time and list them here. I honestly didn't even use all of the supplies that they list, and it still came out beautiful. I feel like I need to also prepare you. This is A LOT of printing, especially doing more than one. I printed out everything in the beginning for 3 kids. Let's just say that I went through two ink cartridges.

paper
colored paper
white card stock
colored card stock
pencil and colored pencils
scissors
stapler
liquid glue (I used Elmer's)
glue stick
double sided sticky tape (I didn't have any so I used scotch tape and glue sticks)
clear tape
clear packing tape
gold glitter (again I didn't have any since my kids spilled it all over the room)
a 5" square of clear acetate or Dura-Lar (I didn't even know what this was so we didn't use it)
exacto knife (I need to get one of these)
paper fasteners
one 3.5" by 5" piece of fabric
one file folder with the tab in the middle
one 6" x 9" manila envelope (I didn't have one so I made one)
pushpin

How we used it:
I strongly disliked government and anything to do with it in school. It was completely boring to me. When I saw this lapbook, I thought it would be perfect, to add a little more fun and creativity to learning about elections. I knew I needed something to engage the kids, because unfortunately, they aren't fans of government or politics either. This has completely held their attention from the beginning. We haven't quite finished the entire lesson, but we have all learned so much from what we've completed.

When we got the download, I immediately pulled it up and started printing. It's laid out so well that it didn't take long. It is very user friendly and tells you exactly what you need to print. You will come to a screen in your browser that is basically everything you need. It starts out with the introduction and directions, and as you scroll down you will come to the reading text to print and the different lessons. I wanted to print the reading text before anything else, and they give you two options with this. Here's a screenshot of the printing options.


As you can see, you can print it in booklet form, or it's available to print out in binder format. We chose the binder format so that it would be easier to print. I just got a 3 ring binder to put the text portion in and also the directions for each lesson. That way it's all together nice and neat.

The text is all of the information you need to teach the lesson. You can obviously expand on it if you want to, or just simply use what's provided. It goes into detail about how our elections work in the U.S. and what it takes to be President. With the text, you also get the audio. This is a great bonus for me, because I have to talk and read so much during the day, it's nice to have someone else do it for me. We have used it pretty much every time. I love the fact that it tells you in minutes at each lesson where you are in the audio, so that you can get started quickly every time.


So, after you get the reading portion printed and ready to go, you can start your first lesson. As you can see from the above picture, the lessons are laid out to you in sections. It starts with, Definition of "Election", and continues all the way down to Vocabinet. We tried to do one lesson everyday, and that was working great for us. I think we are going to slow down a bit, and do one different lesson 2 times a week, rather than everyday. I want to really dig deep into it so that they go over what they've learned, and remember it. The "mini" lessons are perfect just for that. Again, it's easy to know what you need to print for that lesson. You just click on the different sub headings for that lesson, and it brings you to the lapbook piece for that day. It also includes a picture for each one so you can see what it is supposed to look like.

My kids had so much fun working on the different lessons. Even my 12th grader got in on the lap pieces.

 What it suggests, and what we did, was after we read the lesson and discussed it, we did the lap piece for that day. After we finished it, we put it into a zip lock bag until we needed it for the assembly of the actual lapbook.


I know I already talked about it before, but it needs to be said again. The illustrations alone on these pieces are amazing. They are so hands on, and have the perfect pictures to really help the information sink in. I used the colored paper and card stock and it really brought them to life. Some lap pieces are simple and don't take long at all, but some are so detailed that it takes a little longer to do. Some are even interactive like the ones below!


His arm moves with the help of a paper fastener


After you have finished all of the lessons, it's time for the assembly of the lapbook. Since we haven't finished, we had nothing but a bag of lapbook pieces, so my daughter was kind enough to help me put hers together so you can see a finished product. We will just go in and fill the rest of it in as we go.

The entire lapbook is constructed of one file folder with the tab in the middle, and 3 sheets of colored card stock. The file folder is folded so that the to ends meet in the middle. The card stock is taped onto the folded file folder so that you can fit all of the lap pieces on. There's a piece on the left side, the right side, and the top. The pieces are put onto the front and back of these pieces of card stock. There are detailed instructions at the beginning of the lesson to tell you EXACTLY where to put mini books. Even with those detailed instructions, I messed up and put something on the wrong page, but it didn't matter and it still looks great! Thank goodness for that! 


On the back you are supposed to attach a manila envelope so that you can keep the reading booklet in it. I didn't have one so I just made one with a piece of card stock. 


 We did something a little bit different for my 12th grader. He wanted his in a 3 ring binder so he still made the lap pieces, but he's attaching them to construction paper and he will be able to flip through easily to study them all.


We are really enjoying this project. I think it is well worth the price. It's very apparent that a lot of hard work and time went into putting this together. It's $18.95 for the download version and $19.95 for the CD version. This is the perfect time a year to study U.S. elections. Head on over to Home School in the Woods and order your HISTORY Through the Ages Hands-on History Lap-Pak: U.S. Elections and get started today!


U.S. Elections History Lap-Pak  Review
Crew Disclaimer